Author Topic: REMOVING WINDSHIELD TRIM  (Read 10722 times)

RBYCC

  • Guest
REMOVING WINDSHIELD TRIM
« on: February 10, 2008, 08:45:02 »
Any special tools required to remove the two piece chrome windshield trim?

Or just pop the center connectors and start prying gently to pull off from the rubber seal?

Thanks in advance !!!

ED A.
1971 280SL
1988 300CE TWIN TURBO
1990 C43 AMG
2003 G55 AMG

pauldridge

  • Guest
Re: REMOVING WINDSHIELD TRIM
« Reply #1 on: February 10, 2008, 17:09:25 »
Ed.


It's my understanding that the recommended way to install the trim is to insert it into the rubber gasket BEFORE installing the whole assembly on the car.. once the rubber is seated in the car, it holds the trim in place... This would imply that you may play hell trying to get the trim off without actually cutting the rubber seal and removing the windshield.  More importantly, how are you going to get that trim back in place with the rubber seal installed, especially if the rubber seal has hardened over time?

The trim piece itself has a single, center-located, barged extension that fits into the groove in the rubber.

A new rubber gasket is only $50 or so these days, you might be best off just removing the whole thing, and winding up with new rubber as a bonus.

This is what I've done with my restoration (well, halfway so far)...The windshield requires little or no skill to remove... just take an exacto knife, and/or buy one of the windshield seal-cutting kits from Harbor Freight (a piece of cutting wire and two handles), and just cut the rubber all around, then simply lift the windshield out.

I plan on getting a pro to re-install my windshield after the car is painted... although the process doesn't sound all that tricky, I'd rather not wind up with a broken windshield if I can avoid it!

Phil

Phil Auldridge
230SL soon to be 172 Metallic Grey/blue interior. Auto/AC

seattle_Jerry

  • Guest
Re: REMOVING WINDSHIELD TRIM
« Reply #2 on: March 02, 2008, 18:28:40 »
I took off the trim on my 220D years ago and bent the heck out of it in the process. It is not easy. I am thinking of paying to have it done or cutting it out as advised.

1967 230SL Havana Brown Auto with A/C

BaronYoungman

  • Full Member
  • Gold
  • *****
  • USA, IL, Joliet
  • Posts: 596
  • Veronica...
Re: REMOVING WINDSHIELD TRIM
« Reply #3 on: March 03, 2008, 12:23:41 »
So I am confused, I bought my car with the windshield already out.  I got a new gasket and planned to have it profesionally installed....am I to understand I have to screw these 3 windshield chrome trim pieces in 1st?  I do notice now that they have black goop on them, is this the windshield adhesive?  What size screws do these pieces need?  Also are there any other pieces that should be installed before the windshield goes back in?
Thanks, Bob

1971 280 sl 1 car 15 boxes

Download Attachment: windshield1.jpg
22.39 KB

Download Attachment: windshieldtrim1.jpg
73.42 KB

Download Attachment: windshieldtrim2.jpg
127.94 KB
Bob "Baron" Youngman
1971 280 SL silver  1 car 0 boxes
1983 500sec Wheeler Dealer AMG Widebody
1985 500sec Paris Autoshow AMG coupe
1994 320sl wifes car
1988 560sec  Japan "Yakuza Car"

seattle_Jerry

  • Guest
Re: REMOVING WINDSHIELD TRIM
« Reply #4 on: March 03, 2008, 15:12:00 »
I wasn't referring to those pieces. The ones I am talking about are not in your pictures. They are chrome strips that get shoved into a slot in the rubber all the way around the window glass. This causes the rubber to expand.

1967 230SL Havana Brown Auto with A/C

paulr

  • Guest
Re: REMOVING WINDSHIELD TRIM
« Reply #5 on: March 03, 2008, 15:18:50 »
ah yes, but can you get 15 boxes into one car?

quote:
Originally posted by BaronYoungman

So I am confused, I bought my car with the windshield already out.  I got a new gasket and planned to have it profesionally installed....am I to understand I have to screw these 3 windshield chrome trim pieces in 1st?  I do notice now that they have black goop on them, is this the windshield adhesive?  What size screws do these pieces need?  Also are there any other pieces that should be installed before the windshield goes back in?
Thanks, Bob

1971 280 sl 1 car 15 boxes

Download Attachment: windshield1.jpg
22.39 KB

Download Attachment: windshieldtrim1.jpg
73.42 KB

Download Attachment: windshieldtrim2.jpg
127.94 KB


paulr
lovely 1970 280 SL


Download Attachment: IMG000211.jpg
111.81 KB
« Last Edit: March 03, 2008, 15:38:25 by paulr »

BaronYoungman

  • Full Member
  • Gold
  • *****
  • USA, IL, Joliet
  • Posts: 596
  • Veronica...
Re: REMOVING WINDSHIELD TRIM
« Reply #6 on: March 03, 2008, 22:46:01 »
OK so yes or no do I need to put those pieces back on BEFORE I have the windshiel refitted(with new rubber and the chrome stips)?  And what size screw do I use?

Thanks, Bob
1971 280 Sl  1car 15 boxes
Bob "Baron" Youngman
1971 280 SL silver  1 car 0 boxes
1983 500sec Wheeler Dealer AMG Widebody
1985 500sec Paris Autoshow AMG coupe
1994 320sl wifes car
1988 560sec  Japan "Yakuza Car"

Longtooth

  • Guest
Re: REMOVING WINDSHIELD TRIM
« Reply #7 on: March 08, 2008, 04:51:48 »
Bob, I see in lack of answers you need in the responses that you're getting nowhere fast.  here's all I know... not much, but it may be a start for you.

I have a '67 250SL with it's original windshield, rubber, chrome trim that goes on the side posts, and the surrounding trim piece that goes over the rubber all still in place, untouched.

I need to replace my windshield (pitted enough so that in sun at an angle it's more of a haze than a window), AND I need to rechrome the side post trim pieces.

I realize this is the reverse of what you're trying to do, but here's what I've been told.  

To remove the side trim chrome on the posts and top edge of the window frame, I need to remove my window rubber trim (the stuff covering the rubber)... which I need to do anyway to remove & replace the window.

Therefore it's logical to assume that you need to replace the chrome trim pieces on the posts and top rim of the window frame before you install window rubber and associated trim for the surround covering the rubber.  Also, in asking others about replacing the window, there's no need to remove/touch the side post chrome ---- just the sourrounding trim cover the rubber --- and that is removed after cutting the rubber away as has been described by others on this topic below.

As to the screws... the issue you need to address is what the screws screw into on the body of the car.  They screws don't show after all is installed so they're just conical flat-head screws.   They probably screw into tapped holes in the body... and they're definitely a metric thread pitch (duh).  I've found that these types of body panel screws that never show have a slightly larger thread pitch than the same size (appearing) screws that are used for the area's that show (door chrome trim on the front and rear of the doors, for example).... i.e. the thread pitches are not interchangable --- MB used more damned thread pitch's and screw types and sizes than you can shake a stick at... amazingly... just like we used to do in most mechanical engineered gadgets... each engineer responsible for a given piece decided on his own screw callouts... a terribly expensive proposition that competition with the japanese mfg'ers led us to rethink and force far more common screw sizes and callouts in our gadgets and device assemblies.

so, my suggestion without knowing the screw sizes and types, and having received no answers yet to your query of same, is to consult a parts book... which means request the screw sizes or PN's from an MB Parts dept, or from MB Classic Center (Irvine, CA).

The black stuff you see on the chrome is probably (my best guess) the goop MB used to seal the chrome pieces to each other and the body... which in the life of the car to date has hardened to a rock-like consistancy.  I'm not sure though since a sealer between body and chome used on the hardtop chrome at the side-window frame and is greay in color --- and harder than a rock (on my car --- built in April '67). Maybe it was black goop when your car was being built... dunno.

I haven't yet gotten around to replacing my windshield or having the chrome from the posts removed to do my job so I can't actually answer your questions with any degree of authority.  That's the best I can offer at the moment.

Longtooth
67 250SL US #113-043-10-002163
'02 SL500 Sport
« Last Edit: March 08, 2008, 05:01:42 by Longtooth »

bpossel

  • Guest
Re: REMOVING WINDSHIELD TRIM
« Reply #8 on: March 08, 2008, 06:20:42 »
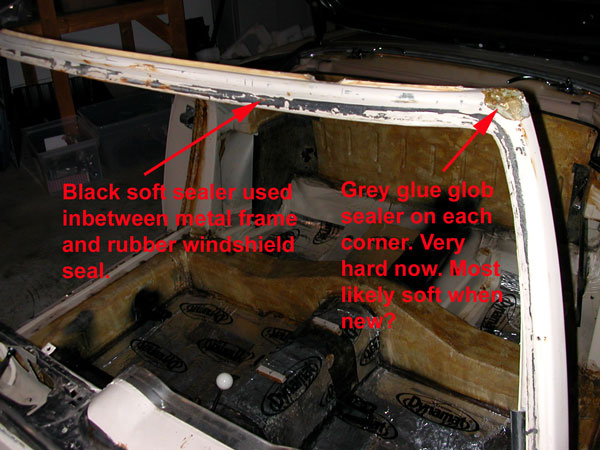
Here is a pic of my windshield area after I took it apart.  In the picture it shows the grey hard glob that Loongtooth refers to...


When I removed my windshield, I documented the steps.  Here is the reverse of those steps.  Steps I plan to follow when I re-install my windshield.  Note: my screws are buried in a box, so cant comment now on their size.  I do know that they are counter-sink screws...

Procedure to re-install windshield trim (in reverse order from how I removed them…)
1. Install (glue) canvas (linen) tape on top sharp edge of horizontal edge windshield
2. Install large horizontal chrome trim.  Has glue or sealer glob on each edge (left & right) under chrome trim and on body
3. Install large vertical chrome side pieces
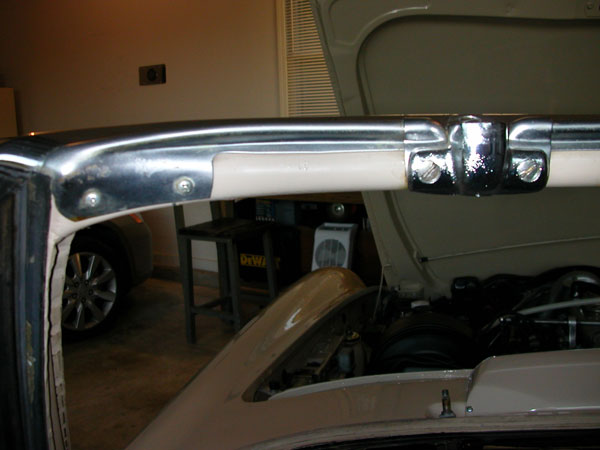
4. Install top horizontal piece (brushed aluminum) wraps around top edge and curves under mirror base

5. Install left and right horizontal brushed alum pieces for #4
6. Install left & right vertical chrome pieces that ultimately hold the rubber window seals.  It appears that these pieces have sealer between them and the vertical chrome installed in #3.  Also on each (under each) top edge of these pieces are a small black thin rubber seal.  It was missing on one side.

7. After all trim is installed, install windshield.
8. With windshield on the ground, wrap rubber seal around it.  Install, push brushed aluminum trim in rubber seal.  With aid of second person, install windshield, rubber seal and brushed alum trim (together as a unit) in windshield frame of car.  From what I have read and heard, the trick is to rest the windshield on the bottom first, then gradually pull back the top side (using the rope trick, rope wrapped around windshield...) and let the weight of the winshield suck the top part in.  I have heard that the rope is needed and also some liquid soap or silicon.  I have also heard that some installers do not use any add'l liquid sealer with the rubber seal, while others do...

I am by no means an expert, but this is how I understand the install to go...

Bob
bpossel  (Memphis, TN.)
'71 280SL  /  '97 E320
« Last Edit: March 08, 2008, 06:42:23 by bpossel »

BaronYoungman

  • Full Member
  • Gold
  • *****
  • USA, IL, Joliet
  • Posts: 596
  • Veronica...
Re: REMOVING WINDSHIELD TRIM
« Reply #9 on: March 08, 2008, 17:01:28 »
OK very informative...but I don't know what this linen tape is or what it is for?

Thanks,
Bob
Bob "Baron" Youngman
1971 280 SL silver  1 car 0 boxes
1983 500sec Wheeler Dealer AMG Widebody
1985 500sec Paris Autoshow AMG coupe
1994 320sl wifes car
1988 560sec  Japan "Yakuza Car"