Author Topic: 250 engine re-build  (Read 22041 times)

pj-tigger

  • Guest
250 engine re-build
« on: September 02, 2009, 21:11:51 »
I don't own the 250 but i'm rebuilding its engine for the owner (i'm also rebuildibg the body of his 300 SEL 6.3)

The car was aquirred cheap as the engine was very sick


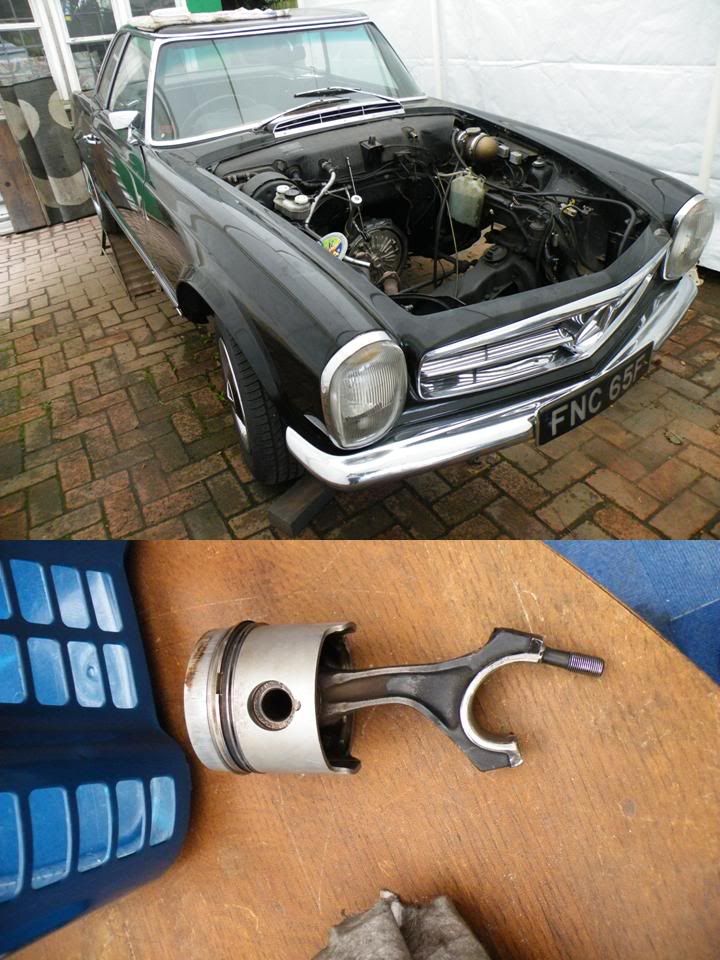
The damaged all seems to come from lack of maintanace (the oil had not been changed for ages & was a black sticky sluge) this caused no2 main bearing to fail (damaging the crank case) and then starving no1 piston of oil & them the rod snaped . fortunatly the rod did not go through the block !.

To salvange the engine the block had to be line bored & a sadle machined for the main bearing ,the crank was re-ground and the bores were also found to be at there maximum oversize so they have been sleeved to std . There was also corrosion on the head which has had to be welded & machined.


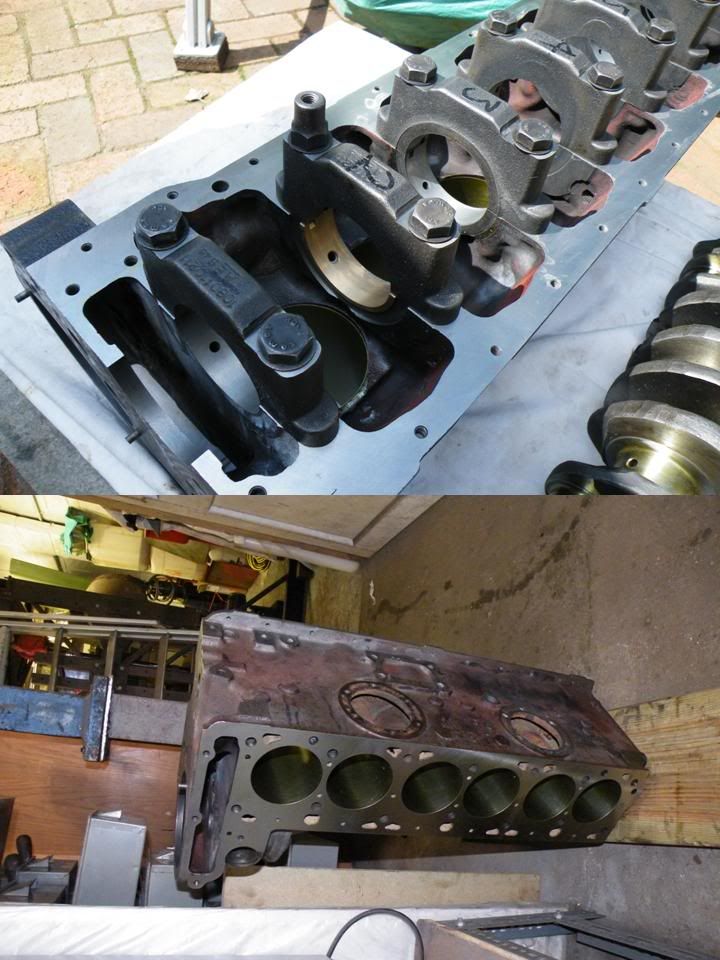
Can anyone confirm the block colour - most people say its black but i now have a 2nd 250 engine & both are flat red/orange with no sign of ever being black


jeffc280sl

  • Guest
Re: 250 engine re-build
« Reply #1 on: September 02, 2009, 22:05:15 »
Hello pj-tigger,

The car you're working on appears to be in very good shape.  Too bad the previous owner didn't change the oil.  This web site can be of great value.  You can find a lot of information using the search function.  If you need more detail just ask and there are many here that will try and provide what you need.

I think the block color was satin black.  There are some nice pictures of a rebuilt engine in this thread.

http://www.sl113.org/forums/index.php?topic=5600.0

Dash808

  • Full Member
  • Silver
  • ****
  • USA, HI, Kaneohe
  • Posts: 320
Re: 250 engine re-build
« Reply #2 on: September 02, 2009, 22:31:51 »
My 250sl engine is red from the Injection Pump forward.  I don't know if this is the top coat or a primer coat showing through.  I'm almost certain the engine has never been pulled.  68k original miles, if that matters. 
Chan Johnson
'67 250sl
Napoli Italian Euro

Bang Bang Booogie!

ja17

  • Full Member
  • Platinum
  • ******
  • USA, OH, Blacklick
  • Posts: 7312
Re: 250 engine re-build
« Reply #3 on: September 02, 2009, 22:44:57 »
Hello,

The re dish color is the primer coat.  Often times the factory satin black wears off showing the red color beneath.  If you look inside the block around the crankshaft, you will see the same red color because the red was used inside and out.  Look at picture number three and you will see the traces of red around the rear bearing castings.

Castings are somewhat porous and a primer coat is often used inside engine castings to seal them off. On the exterior of the block the satin black was applied over the red.
Joe Alexander
Blacklick, Ohio
1969 Dark Olive 280SL
2002 ML55 AMG (tow vehicle)
2002 SLK32 AMG (350 hp)
1982 300TD Wagon turbo 4spd.
1963 404 Mercedes Unimog (Swedish Army)
1989 flu419 Mercedes Unimog (US Army)
1998 E430
1974 450SLC Rally
1965 220SE Finback

wwheeler

  • Vendor
  • Platinum
  • ******
  • USA, TX, Dallas
  • Posts: 2864
Re: 250 engine re-build
« Reply #4 on: September 09, 2009, 19:29:29 »
Is the reddish colored primer equivalent to "Glyptal" paint made by G.E.?

I know glyptal is used for sealing armatures in electric motors and is high temp as well as oil resistant. I have heard of several instances where this has been used to seal the internal engine block as Joe suggested.
Wallace
Texas
'68 280SE W111 coupe
'60 220SE W128 coupe
'70 Plymouth Roadrunner 440+6

pj-tigger

  • Guest
Re: 250 engine re-build
« Reply #5 on: September 10, 2009, 20:46:20 »
When i'm rebuilding an engine i normally paint the inside with Glyptal (i've also used it inside gearboxes & axles).

I've now physically seen 3 250 blocks & they've all been red (seen plenty of photo's of black ones), after discussing this with the owner he's decided he wanted the block finished in red so we've had some engine paint mixed to match the red on the block.


I now have the crank & pistons installed


The next problem i have is with the chain guides (i've hoping soneone here can help) . The old guides were a cast aluminium & the new a moulded plastic . The pins that hold the guides  were held in place by a sprung wire in the centre of the guide. on the new guides one pin is held by a plastic tab in the middle of the hole & the other does not seem to be held in by anything (am i missing something here) sorry no photo's at the moment

mbzse

  • Full Member
  • Platinum
  • ******
  • Sweden, Stockholm, Stockholm
  • Posts: 1748
Re: 250 engine re-build
« Reply #6 on: September 11, 2009, 07:10:17 »
When a Mercedes engine left the factory, in a car, the engine block was painted in satin black finish
just as Joe A states in this thread. Red glyptal was base paint, also applied inside (and visible there)
/Hans in Sweden
When i'm rebuilding an engine i normally paint the inside with Glyptal (i've also used it inside gearboxes & axles).
I've now physically seen 3 250 blocks & they've all been red ../...
« Last Edit: September 11, 2009, 13:32:10 by mbzse »
/Hans S

ja17

  • Full Member
  • Platinum
  • ******
  • USA, OH, Blacklick
  • Posts: 7312
Re: 250 engine re-build
« Reply #7 on: September 12, 2009, 19:57:59 »
Hello,

Yes it is pity that the guides changed to plastic.  The original aluminum/rubber guides would go bad after the rubber wore out.  Then the chain would make noise slapping against the aluminum base metal.
 The new plastic rails eventually become brittle from age and chemicals. If a sloppy chain pounds on these old brittle rails long enough, they can break off and fall  onto the crankshaft sprocket and jump or break the chain.
Joe Alexander
Blacklick, Ohio
1969 Dark Olive 280SL
2002 ML55 AMG (tow vehicle)
2002 SLK32 AMG (350 hp)
1982 300TD Wagon turbo 4spd.
1963 404 Mercedes Unimog (Swedish Army)
1989 flu419 Mercedes Unimog (US Army)
1998 E430
1974 450SLC Rally
1965 220SE Finback

pj-tigger

  • Guest
Re: 250 engine re-build
« Reply #8 on: October 01, 2009, 20:12:58 »
Thought i'd add a few pictures of progress so far on the engine re-build.

When i inspected the camshaft the 2 centre bearings were found to be badly scorred (the lobes were in very good condition however). The camshaft sits directly in the aluminium posts & these were also found to be badly worn . After looking at various options i had the aluminium posts line bored and white metal bearings fitted & the camshaft ground to fit the bearings .

The head is now back & re-assembly started . The seats were re-cut by the machine shop & so installing the valves was very quick & easy . All the studs in the head have been replaced as the originals were bent/damaged/corroded


Re-assembly is a bit slow as i'm having to work out how everything goes together - i got the engine already in bits in plastic boxes !!


Cees Klumper

  • Platinum
  • ******
  • USA, CA, De Luz and Los Angeles
  • Posts: 5524
    • http://SL113.org
Re: 250 engine re-build
« Reply #9 on: October 01, 2009, 21:05:01 »
PJ - don't forget to put in the two smaller hex bolts that help tighten down the front of the cylinder head to the engine block. The third smaller hex bolt is on the outside of the head and is installed correctly as per your photo.
Cees Klumper
1969 Mercedes 280 SL automatic
1968 Ford Mustang 302 V8
1961 Alfa Romeo Giulietta Sprint Coupe 1600
1962 FIAT 1500S OSCA convertible
1972 Lancia Fulvia Coupe 1.3
1983 Porsche 944 2.5
1990 Ford Bronco II

pj-tigger

  • Guest
Re: 250 engine re-build
« Reply #10 on: October 01, 2009, 21:44:46 »
Yes got those - i ordered all new bolts for fixing the head down &  that included the 4 small bolts around the front area (2 inside & 2 outside). I did find out the hard way that the rev/tacho drive need's to be installed before the head is fitted  :)

ja17

  • Full Member
  • Platinum
  • ******
  • USA, OH, Blacklick
  • Posts: 7312
Re: 250 engine re-build
« Reply #11 on: October 01, 2009, 22:40:17 »
Hello,

Actually the drive gear and bushing for the rev counter should be able to be removed with the head on.  Sometimes when the head is  milled the clearances change.
Joe Alexander
Blacklick, Ohio
1969 Dark Olive 280SL
2002 ML55 AMG (tow vehicle)
2002 SLK32 AMG (350 hp)
1982 300TD Wagon turbo 4spd.
1963 404 Mercedes Unimog (Swedish Army)
1989 flu419 Mercedes Unimog (US Army)
1998 E430
1974 450SLC Rally
1965 220SE Finback

Benz Dr.

  • Vendor
  • Platinum
  • ******
  • Canada, ON, Port Lambton
  • Posts: 7136
  • Benz Dr.
Re: 250 engine re-build
« Reply #12 on: October 02, 2009, 00:06:33 »
So, you still have the block red???  Why?
1966 230SL 5 speed, LSD, header pipes, 300SE distributor, ported, polished and balanced, AKA  ''The Red Rocket ''
Dan Caron's SL Barn

1970  3.5 Coupe
1961  190SL
1985   300CD  Turbo Coupe
1981  300SD
2013  GMC  Sierra
1965  230SL
1967 250SL
1970 280SL
1988 560SEC

pj-tigger

  • Guest
Re: 250 engine re-build
« Reply #13 on: October 02, 2009, 01:36:11 »
When i started re-building this engine all the information i had pointed to the blocks being red - i also have spare 129.980 engine from a 108 & this has no black paint on it , i'd also seen another 250 block that was red only. The info recieved from this board show that it should be black but the owner has decided he likes the red & would like to keep it this colour.

At the moment the priority is to get the car back on the road . It would be nice to return it to "as factory" but this will be time consuming as at some time in the cars past somebody decided to chrome/polish etc a lot of the engine components - very "pimp my ride"
« Last Edit: October 02, 2009, 02:12:29 by pj-tigger »

menesesjesse

  • Full Member
  • Silver
  • ****
  • USA, MD, Indian Head
  • Posts: 292
Re: 250 engine re-build
« Reply #14 on: October 02, 2009, 14:53:16 »
PJ
I noticed the side covers are installed.  Be sure that you install the lever for the accelerator on the fwd cover.  The position is very important because if it is wrong you will never get the linkages right.  There were several types used also.  Look through the threads to see some info addressing this.  I have some photos of my engine while it was being mocked up for installation. If you would like to compare just PM me.
jesse 
Jesse
1966 Mercedes 230 SL auto
2003 Mercedes E500
1992 Ford F150
1994 Ford Bronco
2019 Shelby GT350R
1967 Mercury Cougar XR7

pj-tigger

  • Guest
Re: 250 engine re-build
« Reply #15 on: October 02, 2009, 18:26:30 »
The original front cover (aluminium) that has the throttle linkage mounted on it was very badly corroded (nearly all the way through) . when you order a new one from Mercedes there is a replacement part number that is linked to about 6 items , this is a kit for the linkage that superseeds the aluminium cover. You get a steel cover like the rear one , new screws , 2 spacers , 2 new studs and a new bracket. The new bracket bolts onto the studs from the enging mount & this has the pin on it for the throttle linkage. I'll try & post some pictures of this kit soon.

Nate

  • Associate Member
  • Silver
  • ****
  • Mill Valley, California
  • Posts: 267
Re: 250 engine re-build
« Reply #16 on: October 02, 2009, 18:45:12 »
Looks like a Ford engine painted red.
1971 280SL
Arabian Gray / Dark Red Leather

2013 Porsche 911 Carrera 4S Coupe
Black on Black

2013 ML350 4MATIC
Arctic White on Almond Beige
Wife's car that I get to drive

1964 Porsche 356C Coupe
Irish Green on Black
Black Plate CA Car
Unrestored

w113dude

  • Guest
Re: 250 engine re-build
« Reply #17 on: October 04, 2009, 01:59:59 »
This is so exciting, as I'm getting ready to the same kind of work done on my 250 engine.
looks really cool.

shaun

glenn

  • Guest
Re: 250 engine re-build
« Reply #18 on: October 04, 2009, 23:54:57 »
Pi-tigger,  How did you get the rev/tach bushing out in the first place?

pj-tigger

  • Guest
Re: 250 engine re-build
« Reply #19 on: October 05, 2009, 18:39:43 »
I didn't - i recieved the engine in pieces in a number of plastic boxes !!

pj-tigger

  • Guest
Re: 250 engine re-build
« Reply #20 on: October 12, 2009, 19:30:59 »
After some disscussion with the owner the engine is now black  :)


Just waiting on delivery of a few more bits & pieces from Mercedes and then can hopefully get tthe engine finished.

waqas

  • Full Member
  • Platinum
  • ******
  • USA, TX, Austin
  • Posts: 1738
Re: 250 engine re-build
« Reply #21 on: October 12, 2009, 20:10:43 »
Looks great!  :)
Waqas (Wa-kaas) in Austin, Texas

jameshoward

  • Associate Member
  • Platinum
  • ******
  • United States, New Jersey (formerly of London)
  • Posts: 1570
Re: 250 engine re-build
« Reply #22 on: October 12, 2009, 21:20:49 »
Keep the pictures coming if you can bear it (now the block's been repainted the process should be less painful!)

It's fascinating to watch it coming together and to read all the detailed info being offered up by those that have gone before you. Can't wait to hear how it runs.

JH
James Howard
1966 LHD 230SL

ja17

  • Full Member
  • Platinum
  • ******
  • USA, OH, Blacklick
  • Posts: 7312
Re: 250 engine re-build
« Reply #23 on: October 12, 2009, 23:06:00 »
Nice engine stand!  That style is unusual.  I see it works well, and  you can also install the flywheel and/or the clutch assembly with the engine still on the stand.  It looks like you made some custom brackets.

Also, looks much better in black!

Joe Alexander
Blacklick, Ohio
1969 Dark Olive 280SL
2002 ML55 AMG (tow vehicle)
2002 SLK32 AMG (350 hp)
1982 300TD Wagon turbo 4spd.
1963 404 Mercedes Unimog (Swedish Army)
1989 flu419 Mercedes Unimog (US Army)
1998 E430
1974 450SLC Rally
1965 220SE Finback

Cees Klumper

  • Platinum
  • ******
  • USA, CA, De Luz and Los Angeles
  • Posts: 5524
    • http://SL113.org
Re: 250 engine re-build
« Reply #24 on: October 13, 2009, 13:55:00 »
Hear hear - I also noticed the engine stand, looks like a very good setup. And I also like the black color on the engine a lot better than the red.
Cees Klumper
1969 Mercedes 280 SL automatic
1968 Ford Mustang 302 V8
1961 Alfa Romeo Giulietta Sprint Coupe 1600
1962 FIAT 1500S OSCA convertible
1972 Lancia Fulvia Coupe 1.3
1983 Porsche 944 2.5
1990 Ford Bronco II