Author Topic: Another DIY restoration  (Read 31559 times)

star63

  • Full Member
  • Senior
  • ***
  • Finland, Etela-Suomen Laani, Vantaa
  • Posts: 243
Re: Another DIY restoration
« Reply #25 on: February 23, 2014, 19:48:00 »


When I bought the car it had seat belts installed. One end of the belts were attached with only 6 mm bolts!
I bought a set of new belts and decided to do the installation in a way I learned from the "Motoringinvestments" web site.

In order to do so, I had to make an opening to the B-pillar panel for the belt:


The same panel ready:


... and from the back side:


Petri
'67 250 SL (early)
'66 230 SL (long project)
Finland

star63

  • Full Member
  • Senior
  • ***
  • Finland, Etela-Suomen Laani, Vantaa
  • Posts: 243
Re: Another DIY restoration
« Reply #26 on: February 26, 2014, 19:51:22 »


The seats are original. The seat covers had been changed by the previous owner and were still in very good condition.


For safety reasons, I wanted to install headrests. Even though my early seat backs are not very thick.


The headrest with a new matching cover.

Petri
'67 250 SL (early)
'66 230 SL (long project)
Finland

star63

  • Full Member
  • Senior
  • ***
  • Finland, Etela-Suomen Laani, Vantaa
  • Posts: 243
Re: Another DIY restoration
« Reply #27 on: February 28, 2014, 08:57:45 »


Some progress in the paint shop...

Petri
'67 250 SL (early)
'66 230 SL (long project)
Finland

star63

  • Full Member
  • Senior
  • ***
  • Finland, Etela-Suomen Laani, Vantaa
  • Posts: 243
Re: Another DIY restoration
« Reply #28 on: February 28, 2014, 09:25:31 »

I do know that Mercedes cars should have Becker radios.
When I was a little boy, my dad's Volvo P1800S had a Blaupunkt Köln. I remember looking at that fascinating little pointer travelling across the face, seeking radio stations.

I wanted to have a similar Blaupunkt with automatic tuning even though there are Beckers out there with the same feature.

I bought two Blaupunkt Kölns from ebay. They were both sold as inoperative. To my surprise, they both started to work after cleaning and lubricating the tuning mechanism.

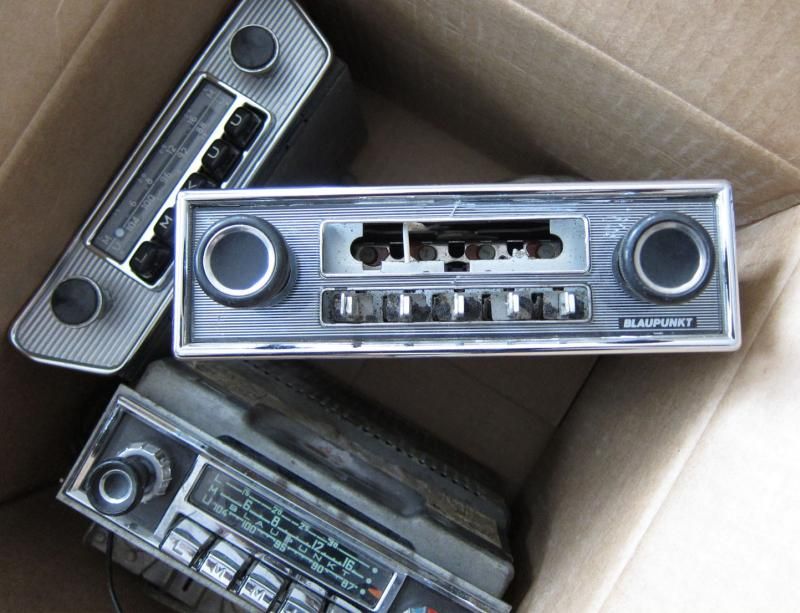
Here is a picture of my basket case Blaupunkts (two Kölns and one Frankfurt)


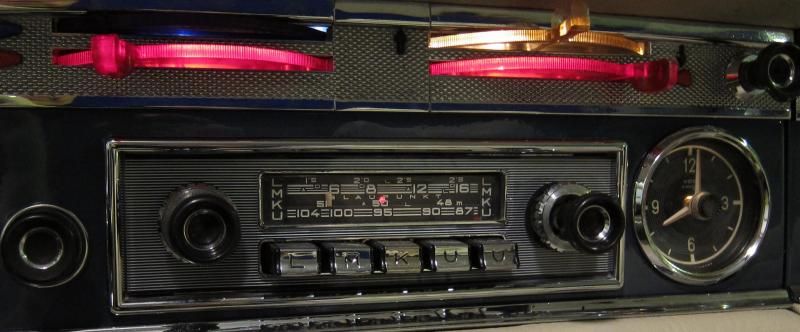
...and this is how one looked after cleaning. I bought new knobs and some other small parts to it as well as a new speaker and an automatic Hirschmann antenna.


« Last Edit: March 01, 2014, 07:18:49 by star63 »
Petri
'67 250 SL (early)
'66 230 SL (long project)
Finland

star63

  • Full Member
  • Senior
  • ***
  • Finland, Etela-Suomen Laani, Vantaa
  • Posts: 243
Re: Another DIY restoration
« Reply #29 on: March 02, 2014, 09:39:28 »


The headlights needed new reflectors. The main reflectors I bought new but at that point I couldn't find foglight reflectors for a reasonable price.
So, I cleaned the old ones and had them silver plated.
Also painted the frame.


Petri
'67 250 SL (early)
'66 230 SL (long project)
Finland

star63

  • Full Member
  • Senior
  • ***
  • Finland, Etela-Suomen Laani, Vantaa
  • Posts: 243
Re: Another DIY restoration
« Reply #30 on: March 02, 2014, 09:58:19 »


Miscellaneous parts after zink plating:


The relay covers turned out really nice after new zink and transfer decal sets (thanks, Wallace!)


The plating shop was so busy (=long delivery time) that I tried zinc plating for some less important parts myself.
These parts received rather thick zinc layer but required some polishing to turn shiny.

Petri
'67 250 SL (early)
'66 230 SL (long project)
Finland

star63

  • Full Member
  • Senior
  • ***
  • Finland, Etela-Suomen Laani, Vantaa
  • Posts: 243
Re: Another DIY restoration
« Reply #31 on: March 05, 2014, 13:39:49 »


The car was finally painted. Looks a bit naked without lights, bumpers and chrome trim.
The color code is 396 instead of the original 172.


Petri
'67 250 SL (early)
'66 230 SL (long project)
Finland

star63

  • Full Member
  • Senior
  • ***
  • Finland, Etela-Suomen Laani, Vantaa
  • Posts: 243
Re: Another DIY restoration
« Reply #32 on: March 07, 2014, 10:13:49 »


What a mess!

I sprayed 7 litres of cavity wax into all the box structures. There was a good amount of overspray on the paint, too. And dripping on the floor...

I found a local shop that made me a new windscreen. Not a big or fancy looking shop, but they have molds for > 1000 different cars and the work quality is excellent.

I used a new seal for the glass and struggled half a day with it. The most difficult part was to attach the seal and the aluminum trim around the windscreen. The installation to the car was not that difficult with the rope method even though I had the wood pieces already in place.


Petri
'67 250 SL (early)
'66 230 SL (long project)
Finland

star63

  • Full Member
  • Senior
  • ***
  • Finland, Etela-Suomen Laani, Vantaa
  • Posts: 243
Re: Another DIY restoration
« Reply #33 on: March 08, 2014, 09:01:57 »


Renewing the wiring harness and installing new brake and fuel lines.

Petri
'67 250 SL (early)
'66 230 SL (long project)
Finland

Larry & Norma

  • Full Member
  • Platinum
  • ******
  • United Kingdom, England, Southampton
  • Posts: 1090
Re: Another DIY restoration
« Reply #34 on: March 08, 2014, 10:02:39 »
Looking good  :) :)
Larry Hall (Gnuface)
2023 Ioniq6
2005 C230
1970 280SL

star63

  • Full Member
  • Senior
  • ***
  • Finland, Etela-Suomen Laani, Vantaa
  • Posts: 243
Re: Another DIY restoration
« Reply #35 on: March 08, 2014, 10:46:11 »
Thank you, Larry!

Re-installing the cleaned parts to the body was the most rewarding and pleasant part of the "restoration".
Petri
'67 250 SL (early)
'66 230 SL (long project)
Finland

star63

  • Full Member
  • Senior
  • ***
  • Finland, Etela-Suomen Laani, Vantaa
  • Posts: 243
Re: Another DIY restoration
« Reply #36 on: March 09, 2014, 09:14:09 »


Yes, I know that the floor should have the exterior color. To me, originality of this particular item was not so important (I can always repaint it later...).
The small holes seen here were drilled for the cavity wax tube.


I also decided not to install any insulation material at this point (before it is sure that no rain water would enter the cabin).


Since the paint color was close enough to the color of the carpet I didn't find it necessary to use black paint on the exposed brackets.


« Last Edit: March 09, 2014, 21:41:15 by star63 »
Petri
'67 250 SL (early)
'66 230 SL (long project)
Finland

star63

  • Full Member
  • Senior
  • ***
  • Finland, Etela-Suomen Laani, Vantaa
  • Posts: 243
Re: Another DIY restoration
« Reply #37 on: March 12, 2014, 17:33:40 »


I feel that an ivory steering wheel suits the parcment interior better than the black one. I bought a used one from ebay and refurbished it. I cleaned the cracks with a small grinder and filled them up with epoxy. After some sanding I painted the wheel with 2k-polyurethane. The first attempt resulted in too white "greenish" shade. I added a few drops of yellow and red to my paint mixture and sprayed again. Now, I was very happy with the result.

I also changed the hub pad cover, painted the back side of the center star and had the inner ring re-chromed.

The heater louvres were also re-chromed. Very interesting to put the assembly back together. During chroming, the little hinge pins had grown in diameter and didn't fit in their holes  ::)

When changing the chrome rings to the speedo and tachometer I accidentally broke the glass. Well, didn't have to spend time cleaning the old glasses  8)

Petri
'67 250 SL (early)
'66 230 SL (long project)
Finland

andyburns

  • Associate Member
  • Platinum
  • ******
  • New Zealand, Auckland, Drury
  • Posts: 1212
Re: Another DIY restoration
« Reply #38 on: March 12, 2014, 18:27:09 »
Looks fantastic.  I agree that the parchment looks much nicer on the blue.  The steering wheel job you have done also looks great.   I have seen quite a few of them that have been painted in slightly the wrong shade, usually to white, and it does stand out.  Think you have nailed the color and the paint job as well. 
Andy Burns, Auckland New Zealand
1963 230sl
1967 250s w108
1969 BMW 2002
2007 Mitsubishi i car

DaveB

  • Full Member
  • Gold
  • *****
  • Australia, Western Australia, Lathlain
  • Posts: 951
Re: Another DIY restoration
« Reply #39 on: March 13, 2014, 01:03:59 »
That is remarkably quick work, especially considering the high standard. It must be vary satisfying to be driving now. Congratulations!

Oh wait, I backtracked and saw this was 4 winters of restoration :) Anyway, very nice
« Last Edit: March 13, 2014, 01:14:43 by DaveB »
DaveB
'65 US 230sl 4-speed, DB190

star63

  • Full Member
  • Senior
  • ***
  • Finland, Etela-Suomen Laani, Vantaa
  • Posts: 243
Re: Another DIY restoration
« Reply #40 on: March 14, 2014, 15:46:25 »
Thanks mates  :)

- p
Petri
'67 250 SL (early)
'66 230 SL (long project)
Finland

star63

  • Full Member
  • Senior
  • ***
  • Finland, Etela-Suomen Laani, Vantaa
  • Posts: 243
Re: Another DIY restoration
« Reply #41 on: March 14, 2014, 19:54:27 »


This is finally, how my Pagoda looked in Septemper when I parked it in the garage for the winter.


« Last Edit: March 14, 2014, 20:05:57 by star63 »
Petri
'67 250 SL (early)
'66 230 SL (long project)
Finland

star63

  • Full Member
  • Senior
  • ***
  • Finland, Etela-Suomen Laani, Vantaa
  • Posts: 243
Re: Another DIY restoration
« Reply #42 on: March 14, 2014, 20:01:07 »


Some more pictures...


Petri
'67 250 SL (early)
'66 230 SL (long project)
Finland

star63

  • Full Member
  • Senior
  • ***
  • Finland, Etela-Suomen Laani, Vantaa
  • Posts: 243
Re: Another DIY restoration
« Reply #43 on: March 14, 2014, 20:05:10 »


...and more...


Petri
'67 250 SL (early)
'66 230 SL (long project)
Finland

Garry

  • Full Member
  • Platinum
  • ******
  • Australia, Victoria, Kyneton and Brisbane Queensland
  • Posts: 5186
  • Audit Committee
Re: Another DIY restoration
« Reply #44 on: March 14, 2014, 20:36:57 »
Petri,

Absolutely fabulous.  Just love the extra interior bling of the chrome on the 230/early 250’s.  Looks fantastic.

Andy Burns, this is for encouragement for you and where you will be when it is all done.

Garry
Garry Marks
Melbourne/ Kyneton, Brisbane. Australia
1969 MB 280SL 5 speed RHD SOLD.
1965 MB 230SL Auto RHD Lt Blue 334G, Top 350H, 213 Leather, Tourist Delivery.
1972 MB 280CE Auto RHD 906G Blue Grey
2005 MB A200.
2006 MB B200
2019 Izuzu DMax 4x4 with Slide-on camper.
2022 Volvo XC40 Twin Electric

kampala

  • Full Member
  • Platinum
  • ******
  • USA, CA, Hermosa Beach
  • Posts: 1211
Re: Another DIY restoration
« Reply #45 on: March 14, 2014, 21:11:48 »
Phenomenal ... amazing how great it looks ... thanks very much for sharing this retrospectively. 

250sl - later - manual
280sl - 1971 - Auto - LSD

Aslam

Bonnyboy

  • Full Member
  • Gold
  • *****
  • Canada, BC, North Vancouver
  • Posts: 893
  • 1969 280sl Euro 4sp LSD
Re: Another DIY restoration
« Reply #46 on: March 15, 2014, 14:40:54 »
That white interior oozes charm.   Very very nice.  The whole car is amazing.   

One question though, people talk about the extra bling / chrome on the 230/250s.  Can somebody explain where that extra bling is compared to a 280sl. 
Ian
69 280SL
65 F-100
73 CB750K
75 MGB
78 FLH
82 CB750SC
83 VF 1100C
94 FLHTCU
08 NPS50
12 Pro 4X

Larry & Norma

  • Full Member
  • Platinum
  • ******
  • United Kingdom, England, Southampton
  • Posts: 1090
Re: Another DIY restoration
« Reply #47 on: March 15, 2014, 15:09:27 »
This has to be my favourite colour combo, superb :) :)
Larry Hall (Gnuface)
2023 Ioniq6
2005 C230
1970 280SL

star63

  • Full Member
  • Senior
  • ***
  • Finland, Etela-Suomen Laani, Vantaa
  • Posts: 243
Re: Another DIY restoration
« Reply #48 on: March 16, 2014, 07:46:11 »
Thank you, everyone, for your kind words !

I'm also quite satisfied with the color combo. I was planning to paint it dark blue 332 (even bought some paint). Dark blue is an elegant color but I'm happy I eventually went for 396.

The car was "ready" just on time for Willingen. It had been more or less sitting for the last 21 years and such a long trip made me a little nervous. Everything went extremely well, though. A voltage regulator was the only thing that broke and we were lucky to find a functional used one on the way  :D

Even though the car is now driveable, I have a long work list for this winter. Or should I call it a wish list...there will be a good number of items transferred to the following winter  ::)
Petri
'67 250 SL (early)
'66 230 SL (long project)
Finland

Rolf-Dieter ✝︎

  • Platinum
  • ******
  • Canada, ON, London
  • Posts: 3683
    • Best Pagoda Site second to none!
Re: Another DIY restoration
« Reply #49 on: June 12, 2014, 01:18:29 »
Well done Petri!  ... Enjoy the summer driving and further success with the additional work/wish list.
DD 2011 SL 63 AMG and my 69 Pagoda 280 SL